Pages

Thursday, September 27, 2012

mouse day- really it's picture day

It didn’t start out as mouse day.  It’s was really just picture day at school and I needed a fun little book, and activities that I could either be brief with or expand upon.   Picture day is a lesson in flexibility at our school, we never know when our class will get called and what activities we will miss.   


First, I introduced my special friend that had come to school.  I really took my time getting him out of the box.  I scurried my fingers around in the box.  The kids were pretty convinced it was alive, whatever it was.  Then I peeked his little eyes out of the box and ducked them back down again.  They watched that box so closely waiting to see him.  Then he came out and everybody got a good look.   This is just one of Bee and Lou’s toys. I think he’s from IKEA. I would guess he was @ $1.00.  I’m a big spender like that. 


I tell the kids this book is about an adventure my mouse friend had at school.   I have used this book before and I just love it.  It’s called Mouse Views.  It’s written by Bruce McMillian.   


It a simple book with few words.   The mouse gets out at school and goes on a little adventure.  


 He sees things in the classroom, but they are big to him.  The picture on the left shows the item he sees in an up close mouse view and the following page shows what it was he saw. 


 After reading, I had the kids name the things he climbed over.  I had these items (or similar) behind a table.  When they named one, I brought out the item and had my little mousey climb over them.   


He did silly things like try to nibble on the erasers, typed his mom an email on the keyboard and played three blind mice on the piano. 


 We played this popular song/game, Little Mouse, Little Mouse a few times so that everyone got a turn to guess.  I just googled a house clip art and a little mouse clipart to make my set.  My pieces are laminated, but they wouldn’t have to be.   The kids said the full rhyme at their turn,  “Little mouse, little mouse, are you under the ___(name a color)__ house?”  


 Then I flipped it over and we checked. 


We've played several versions of this in the past.  It's a fun one, the kids enjoy it.


I showed these three 'new to me' books.  My sister just brought them to me two days before.  The timing was perfect.  These books are darling.  They have no words, so the kids have to really really watch closely. All three are just too cute and are by Monique Felix.  


They are called The Colors, The Wind, and The House.  The one about colors was a nice follow up to the book Mouse Paint, which my co-teacher read a week ago to the friends. 


 We sang this fun little song about a cat and a mouse.  I show the kids a motion (hissing, claw sort of cat motion) for the cat and a few little motions for the mouse (creeping, sleeping, running, etc).  I made them up on the fly and can’t even really remember them exactly.  You can add verses or change it however you want.  This is about how I sang it that day.  It’s one of those that different each time!

The little mouse is creeping, creeping, creeping.  The little mouse is creeping, in the house.
The little mouse is sleeping, sleeping, sleeping.  The little mouse is sleeping, in the house.
The old grey cat is creeping, creeping, creeping.  The old grey cat is creeping in the house.
The little mouse is running, running, running.  The little mouse is running, in the house.
-Then we decided that the mouse should run outside and sang a verse like that.  Then we thought the mouse should be sleeping again, in his own house and made something up for that.  
 
The kids wanted a chance to touch the mouse, so they sat in their spots and mousey and I walked the inside of the circle and got a little pet and many kisses from the kiddos. 

It was a laid back, flexible day and went really well.  I love days like that!

Saturday, September 22, 2012

stuff to do


 I haven't been blogging like normal.  I've had stuff to do.  School is  keeping me busy.


There's also been some soccer. 


And then we bought one of these.  The minivan, not the kid.  But the whole car shopping was more time invasive than I thought it would be. 


There have been house guests and birthdays.


This yummy gluten free cake was made by my friend and baker (from Bee's party) for my sister.


And last trips to the amusement park before the season ends.  That's Bee with my youngest sister (who you may have met here).

 
Seriously, Bee rode this!  I wouldn't do it, but she asked to ride it!  It's the world's tallest water ride.  135 feet in the air.  45 degree angle drop. 


The garden is almost finished, but still putting out more than I care to collect right now.


There's been a lot of extra art time here.  Lou is being pretty prolific with his art right now.  He's pretty much in my favorite art stage.  All his drawings are just precious. This is daddy as an astronaut.


And then there's all the extra clean up he requires. 


Plus, hubby and I both had the flu last week and now have nice head colds.  No picture for this one.  You're welcome.

Sunday, September 16, 2012

indoor sand castles


I'm just keeping it real for a minute.  The kids love playing in the sand box, but the neighbor's cat has been pooping in it.  Gross.  I do thank that cat for the lack of rabbits in the garden this year, but that's just too much.


Since they can't use the sand box, we found another way to enjoy some sand castle making.  I wrote about it last summer, we used the same recipe.


We had a tiny bit of clean sand in a bag in the garage and were able to use that.


Excuse me, she has to take a phone call.


Alright, back to work.  Here's the recipe we used.  
  • 1 cup sand
  • 1/2 cup cornstarch
  • 1 teaspoon alum
  • 3/4 cup water
  • Shells (optional)
  1. Add the sand, cornstarch, and alum to a saucepan and use a wooden spoon to combine them completely.
  2.   Add the water and stir the mixture until it is smooth and the cornstarch is dissolved.
  3.   Cook the clay over medium-low heat, stirring occasionally. The clay should start to thicken within a minute or two. Stir more vigorously, being sure to scrape the mixture from the sides and bottom of the pan.
  4.   After about 3 minutes of cooking, the clay will have thickened to the consistency of play dough. Remove the clay from the pan. Once it's cool enough to touch, you can start sculpting. (For best results, use the clay within a day or two of mixing it.)


The kids had fun, they got to enjoy some sand play and we ended up with a pretty cool sand sculpture.  They take just a day or two to dry and then dry really hard.  They make for a great display.


I might suggest working on a paper plate.  We had a moldy spot under one of the biggest thickest chunks. It only happened there, so I think a paper plate would take care of that.

Thursday, September 13, 2012

soccer

Good grief, I'm about two seconds from needing a mini van.  We're in soccer mode over here.  Sorry, indulge me for a moment.


Could they get any cuter?  


At the first game, Lou busted right out of his shoe.  No one had duck tape, but we managed with some first aid tape.


New cleats were the first thing we did after school the next day. 

Wednesday, September 12, 2012

very hungry caterpillar -new fun


This story re-telling can is inspired form this pin.  It's from the blog Strong Start, although I can't find the specific post on their blog.  Before I forget, here are a bunch of butterfly activities from last year.


The can is covered in tissue paper and water ed-downed glue.  The (removable with velcro) wings and the antennae are laminated tissue paper.  I just hot-glued the antenna to the inside of the rim.  I will be doing any lid removable, so I think it's sturdy for our purposes. 


I used some garage sale embroidery thread to make a raggedy stripe on the little guy.   Bee helped me sort of knot and loop and tie and cut, almost one of hose friendship bracelets where you are just slip knotting around all the other strands.  We hot glued that on.


I was picturing the pieces going in the mouth with a clang, so I used old canning jar lids and a hot chocolate can with a metal interior.


The lid already happened to be red.  That's because we like hot chocolate with marshmallows and that's the red lid at our store.  The clip art for the food items is from a google images search.  There were several choices for 'very hungry caterpillar food.'   Lou glued those on blue circle and I laminated them before hot gluing them to the old lids.   The kids will touch those, so hopefully they'll be sturdy enough.


Bee and Lou suggested a 'nice healthy green leaf' after I was done, so we laminated a tissue paper leaf. 

My co-teacher also planned some new hungry caterpillar activities, so we might spend a few days reading and reading this book.  Good thing it's always a kid favorite!

Saturday, September 8, 2012

first day of school for me!


 Here's my classroom.  I've been so excited to get it all finished and to share pictures.  I've had the pictures up and ready all week, but it's taken all week for me to get a chance to write anything.  I share the room with my wonderful co-teacher.  Here we are- ready for the kiddos to come. 


It's just our room during the week, on Sundays, the Sunday school teachers move it.  We have to pack away most of our decorations and goodies on Fridays and set up again on Monday. It stinks, but it's part of it.


Here's the finished project involving the many many yards of denim.  I made new curtains for all the classrooms.  I was glad when it was done!   We tried to keep the room inviting and engaging but not over stimulating.


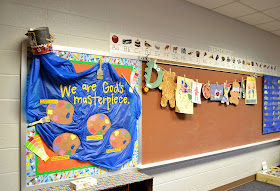
We got a fresh coat of paint this summer but lost our big bulletin board in the process.  We tweaked our original bulletin board idea and made it fit a smaller one.   Lou volunteered some of his artwork for the first few days until we start using the chalk board.


I made up this banner and had planned to hang it in hallway, but plans changed.  I do like it about our counter area. I used the leftover red and white dot card stock paper from Bee's birthday thank yous.


The kids spend almost an hour of each day in what we call 'the big room.'  It's our enrichment area with play centers and art areas, etc.   Those fabric clouds were another summer sewing project.  They are just white muslin rectangles and are magnet-ed to the ceiling. They sort of help tone down the florescent lights.   All of the classes rotate through the room during the morning.


Here's from the other side of the room.  It got fresh paint this summer too and is even cuter than last year.

Monday, September 3, 2012

more pants to skirts

I've mentioned before (Here's the last set)  how we are the recipients of such lovely hand me downs for the kids from friends.  It's such a blessing!  When we are done, we try to bless others in the same way.  The little girl we pass most of Bee's things to does not wear pants.  Our shorts and tanks go to a different home. I am able to transform some of pants into skirts for her.  They take a bit longer than one would think, but I love that she gets something original and we are able to share the bottoms again.  Once they are on their fourth kid, they could use a little work anyway.


About 90% of the pants need extra fabric added to allow for movement; she's not a mermaid and needs some leg room.  I put all the fabric for this on in the back.  There are only so many places you can add it, so I like to mix it up. I added some hearts to the front to add some detail and cover a slightly worn spot.


This khaki pair got fabric added in the front and back.  The pleated ruffle on the bottom added the required length. 


Then I couldn't help  add flowers to the front in coordinating fabric and buttons.  


I have four more pair of pants laying on the cutting board, but this is a filler project for me.  There is no deadline, so it gets pushed off.