Saturday, May 28, 2011

more yard sales

Here are last Saturday's sale finds.  First up are Bee's finds.  I'm struggling with finding a balance between letting her spend her money however she wants and telling her what not to buy.  I usually try to gently guide and influence her spending, but often when we are discussing an item, the seller just gives it to her for marks it down to pennies.  I have decided I'll just get to resell the junk purchases.  

She bought the barbie for $1, the snake for 25 cents, the basket for 10 cents, the teapot for 25 cents (that's one of the purchases I was telling her not to spend $2 on and suddenly it was only 25 cents.  the little fabric box was also the same story and ended up being 50 cents.  Then she was out of money.


Here are my purchases.  Basket for 50 cents, iron on transfer paper for 50 cents, two pattern for 10 cents each, a zipper for a nickel and a hoop for 50 cents. Big spender.


Here are Lou's purchases:  two transformers fresh from their Mickey D's wrappers for 50 cents a piece.  The seller was collecting them and they were all numbered and labeled.  He ripped the plastic right off after buying.  The football and velcro glove was 25 cents courtesy of a nice grandmotherly type lady who wanted to give it to him. I insisted on him purchasing it.


Here's hubby purchase:  an old Nintendo 64, just for messing around  for $20.   He got some counter top pieces for free.  He installed them before I could even take a picture.


We ended up stopping by a friends yard sale and she gave us a bag of goodies, just for being us. That, or she was tired of sitting outside and wanted things gone.  Anyway, two dressed and two tops and one pair of shoes for Bee.  We tried the black and red dress on when we got home and I realized that it was going to bee too short this winter.  I shortened the sleeve and now she can wear it right away.  The top is velvet, so maybe we'll save it for the days when it's not crazy hot.


I love seeing the good deals that others are getting at yard sales.  Here's another blog that I follow where she shares her finds each week:  Jess at The Preschool Experiment has a good eye for the same kinds of things I'm searching for.  She also shares some really fun preschool ideas on her blog that she uses at home with her little people.  I don't know where she lives, but I'm pretty sure we'd rock some sale if we could shop together.  Plus, she's a reader here, so that makes her extra cool.

Friday, May 27, 2011

simple fix=happy mama

My sweet hubby had a great find a yard sale this past weekend.  For free, he picked up two pieces of pretty counter top.  Right after we got home, he went right to work installing them in the garage.  He'd be really wanting to set up some kind of work bench in the garage and now he had a one, a pretty one.  That freed up a piece of good size piece of wood that I also had be eying for a project for me.  He had planned on using a scrap from this kids stage project for his work bench, but I was all too happy to get my hands on it. 


Here's my sewing space with my new fix.  I now have a great space for laying projects out and big enough for my cutting mat.   The sink area (while great when the kids and I paint) was a wasted top space.  I didn't want to pull out the sink, but I wanted it more usable for sure.


The big piece of wood was cut to fit the top plus hang out a few inches to accommodate my cutting mat.  Hubby cut out a notch for the sink faucets and this simple project was done leaving one happy mama. 


I also finally hung something on the wall behind the sink (although you can still see through this current fabric- leftover from Bee's dress)  See what's back there?  It's the fuse box.  The curtain hangs out an inch and a half or so, so the fabric isn't laying right on the box.  It's probably still a fire hazard...


I've been doing a lot of cutting lately for a new project (my ADD kicking in again).  Happily, I will not be cutting on the floor anymore!  Here are four blocks done of a spider web and star pattern.  Maybe for a quilt, probably for a smaller project.  I do love using us these small pieces of favorite fabrics from other projects. 

Hubby has been asking me every day if I've shown his new work bench here.  I guess I'll have to take some pictures and show off his free counter top find.

Thursday, May 26, 2011

eye candy and camp out party part 2

I can't wait to break into this!  I ordered this twisted bakers twine from Hobbies From the Heart on etsy.  She was super fast and has the cutest things in her shop- all major eye candy.   She even had cards and tags and cupcake toppers- all kinds of goodies.   I'm going to be using lots of this twine at Lou's birthday party.  


I've gotten into it now.  I used it to attach tags to take home smores bags.   I just made these tags up in Word, because I still don't know how to use photo shop.


Inside are the fixens for more smores to make at home.


And there's that fun twine!


I also made some stickers up for the trail mix. I found the camo sandwich bags at Target in the dollar section.  I'll just set these out on the treat table. 


There are a lot of last minute projects going on here at Camp Luke.  Some cleaning to be done and lots of last minute shopping.  What a fun week.

Wednesday, May 25, 2011

bags to africa

Some of our friends from Florida sold everything and moved to Africa.  They started a school for orphan children in Kenya called Springs of Hope.  It was clear for them.  It was what they had to do.   Awesome.  I don't think there are any other words for that than that, awesome.

I was ready to show you what I mailed to them, but I want to show you some of these beautiful children first (these photos are from my friend Molly's face book page, I assume she took all the photos herself).

Is this child not beautiful?  


Here are several children from the school.  Judging from the photos, they have lots of little guys all the way up through big ol' teenagers.


These little ones are precious. 


Someday, I'd love to go in person and love on the little ones.  I'm pretty content though, that right now that's not what I'm able to do.  But, I wanted to do something.  

"Each one should use whatever gifts he has received to serve others."  1 Peter 4:10 (NIV)

So, I emailed my friend and asked what I could make.  What could I sew for the kids, what could I craft or make that they would appreciate?  Molly said 'bags!'  The kids need school bags.  She said the kiddos are rough on their bags and they need replaced.  Ok, I could work with that.  She described the perfect bag; over the shoulder, sturdy material, pockets, big enough to hold books and supplies.  I was all set to work on these bags (slightly fearing the 'sturdy material' I'd be working with as that is what messed up my machine a year ago).  

At a race a few weeks ago I saw the exact bag I needed sitting on a table for sale.  I decided I should buy one to help me make my bag pattern.  When I got talking with the man at the table, he agreed to give me all the bags he had left for free.  FOR FREE.  For the children of course.  The bags were perfect; over the shoulder, sturdy, pockets, big enough, 19 bags for some little bitty people  in Africa.   I did see two drawbacks; they had a cancer logo across the front and they were all the same.  As a mama and teacher, I know that identical bags were not going to work.  I also didn't want the logo;  I didn't want it to feel like a surplus donation.


The bags were easily made unique and logo free by sewing a strip of fabric across the front. 


I picked out fabric for boys and girls and covered all the logos.


A large stack that didn't seem to end finally got finished.


I think they meet the requirements and turned out pretty cute. (10 points for my sister if she recognized the fabric in the top right corner of the picture under this.)


Yeah, pretty cute... did I say 19 bags?  No, I did send them all.  I can't wait to see pictures of the recipients with their new school bags.  Or just the recipients, I think I look at pictures of the children all day.


Ok, This is not bag related, but this is the photo of one of the kiddos that I saw on Molly's facebook page that made me start thinking I needed to do something.  I can't make shoes, I wish I could make shoes.  I want to put this on this precious child's feet.  It's one of those pictures that makes you stop.  and think.  and feel bad that you have a dozen pairs of shoes in your closet.  This sweet little guy has a new pair of shoes.  Wouldn't it have been cool to be there and give him the new shoes?  Someday!


edited to add:  One of my favorite blogs, Stuff Christians Like, has a nice post today about serving where you are.

Tuesday, May 24, 2011

jacket remake

I feel silly posting pictures of myself like this, but I was really love how this jacket came out, so I'll do it. I was totally inspired by Meridith at Yours Mine and Ours (Here's her jacket fix). She's a freepiler and thrift store shopper who loves to remake and re-purpose outfits like crazy.  I wouldn't be able to pull off some of her cute pieced together outfits, but I love seeing what she comes up with .


In true Meridith style, this jacket was freepiled.  It was in a pile of clothes at work that someone just wanted to give away.  free.  from a pile.  freepiled.   It's a nicer brand than I normally buy (all of the clothes were- it was wonderful!) but I loved the fabric and buttons and thought I'd do something to make it fit better.


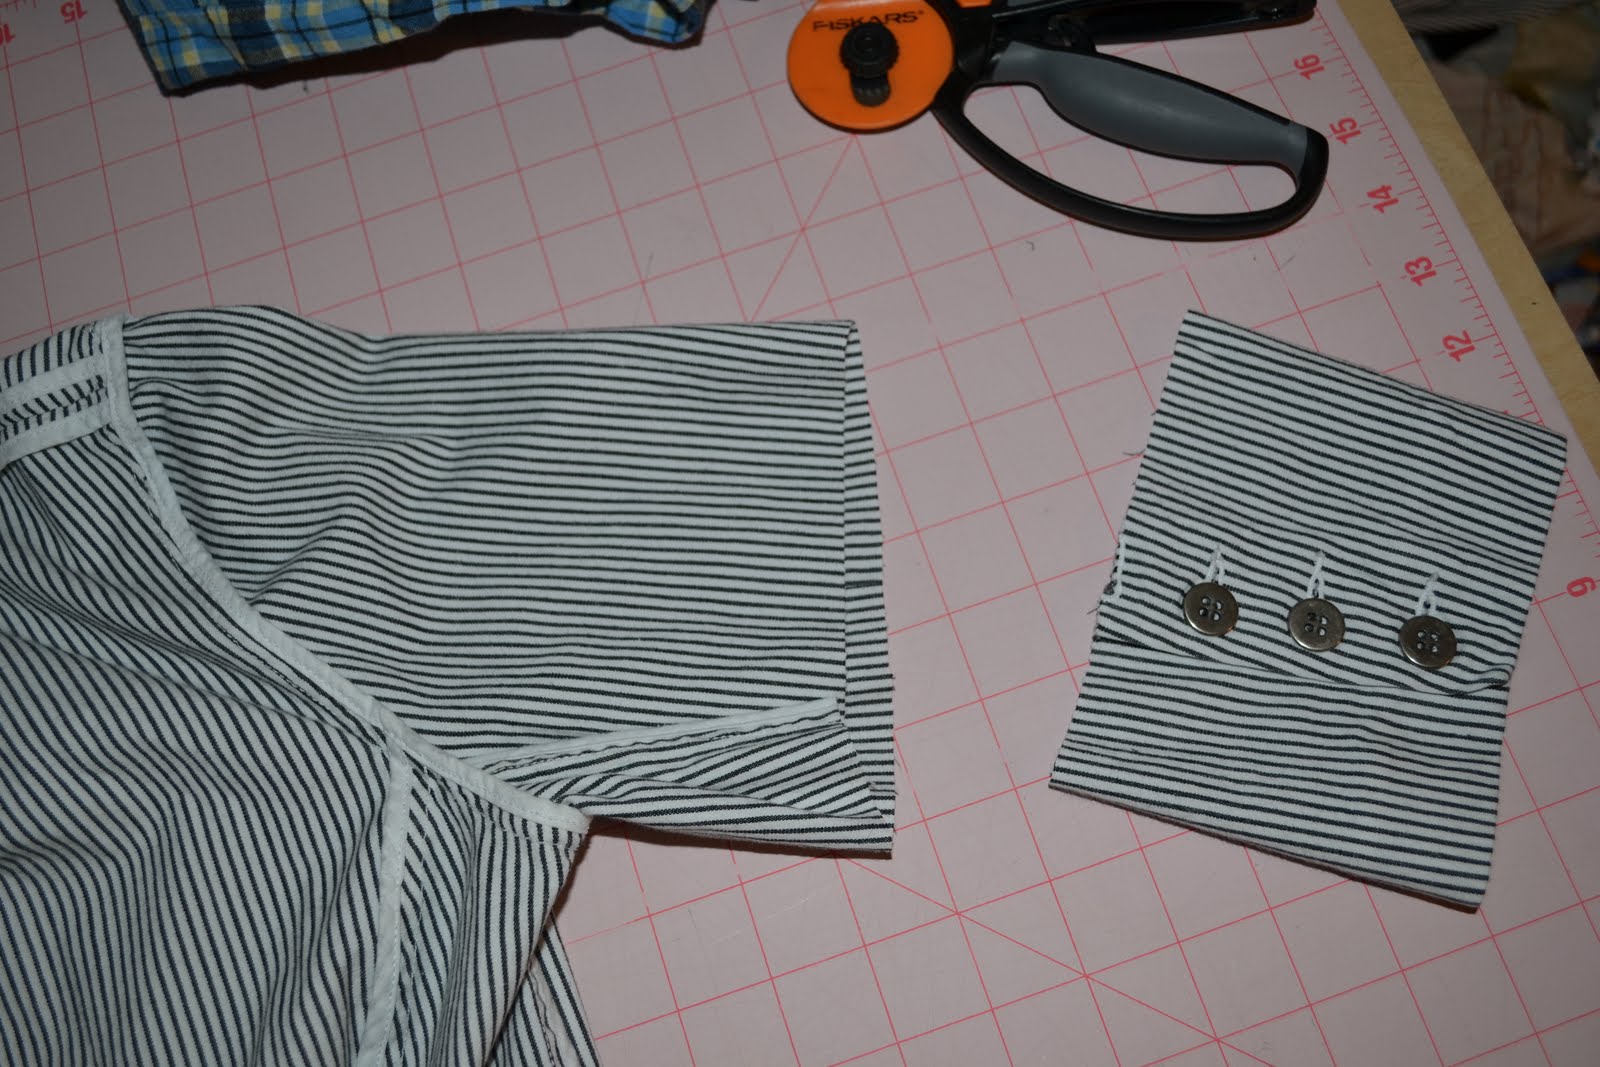
I chopped off the sleeves and kept the cuff part.  The buttoned cuffs were too cute to discard.  I took in the sides and sleeves and reattached the cuff at midarm.  I toyed with shorting it, but I wanted the length so it would work at school.   I used the scrap from the sleeve fix to make a belt and two belt loops.


I added a little fabric flower brooch. I made it on Sunday before church while I was supposed to be eating breakfast.  I had glue on red beads in the middle, but ripped them off on the way to church.  I like it better plain.


Bee agreed to be my camera gal.


The sleeve length was nice but the belt was my favorite change.


Alright, give me back the camera silly Bee.


The jacket that sat on the floor of my closet for 2 months has finally been remade and I love it!  It's time to celebrate.


(Bee loves picking all the petals off my roses.)


Celebrate!  (Oh my goodness, isn't she sweet!)

Monday, May 23, 2011

harvest

This week was a happy one at our house.  The strawberries are coming in!  Here's one for you!


Don't worry, Bee and Lou have already filled their baskets.  Everyday.  Even the ones that weren't quite ready.


They're filling up on lettuce and spinach too.


Bee will even eat this lettuce, so we're pretty excited about that!


Now we wait for the other things to grow and be ready to eat!

Sunday, May 22, 2011

a thank you

I made up this little zipper pouch as a thank you to a friend.  She is the older sister of one of Bee's classmates (the boy she wants to marry) and has passed down piles of adorable hair accessories.  Bee was thrilled.   I used my regular plan for making a lined zipper pouch and added a ruffle to the top layer of fabric before sewing it up. 


I also added three little rolled flowers, mostly because the ruffle was crooked and now you really can't tell.  This is the first time I've made fabric flowers in this style and they worked out really well for sewing with machine directly onto the fabric.  (My sewing machine is back from repair and is a much happier machine.  She's so quiet and peaceful to work with).


I went to find a gift bag and didn't find anything small enough on hand.  I have a stash of paper bags I've been saving up.  They are thinner than grocery sack and delightful to work with .


I sewed the sides and used a slightly different looking stitch on my my machine to sew around the edges.


The top was folded over and two hole punches later and we were in business.  I sure hope this friend knows how much we appreciate her generosity.  The girls could very well be sisters (in-law) some day!

Saturday, May 21, 2011

handwriting font

I often get asked what fonts I use for kid's projects.  When I want little ones to read it, I make sure I use the fonts where they can plainly recognize all the letters.  It's pretty confusing when they see
g  a    and    g  a

and they look different.   To me, it would be like showing them cursive when a little person is just learning letters. Clearly, at some point, they should be shown these, but that can come after there is a good foundation.

Here are some free fonts online that I like.

This site has a great handwriting practice font and even has the lines!  It's the file called penmanship zip.  It looks like this:
Aa`    
I also use a free font from dafont.com called print clearly.  It looks like this:

Aa Bb Cc  Aa Bb Cc
Back when I taught 2nd and 3rd we used D'Nealian.  I actually prefer it, but here we use zaner bloser.  I suppose it doesn't matter much in the long run.  When in Rome I guess.